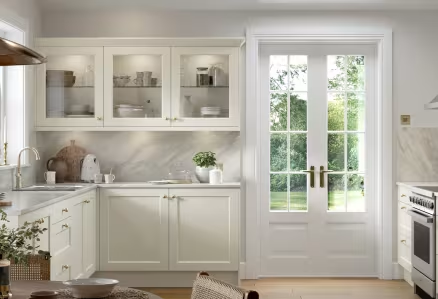
How to Adjust Kitchen Cupboard Doors
Even in the most perfectly fitted kitchen, nothing ruins the beautiful look quicker than uneven cupboard doors. Over time, kitchen cupboard doors shift out of place, due to daily use, humidity and simple wear and tear. Although unavoidable, this can leave your kitchen with gaps, misaligned edges and doors that refuse to close properly.
Thankfully, there is no need to call a professional to re-adjust them for you. Learning how to adjust kitchen cabinet doors yourself is a quick and easy DIY fix that will transform your kitchen in just a matter of minutes, leaving you with the perfect kitchen you deserve. Even better, all you need is a screwdriver, patience and a steady hand.
Our simple, step-by-step guide will help you restore your cabinet doors to perfection.
Why Should I Re-adjust My Cabinet Doors?
Crooked and uneven cupboard doors can leave your kitchen looking untidy and ruin the cleanliness of your home. Moreover, misaligned doors can cause extra strain on your hinges and fittings, leading to unnecessary long-term damage. Learning how to align cupboard doors will enhance your kitchen's sleek style and help maintain your cabinets for years to come.
With just a few easy steps, you'll learn how kitchen door hinges work and the simplest ways to adjust them, making your dream kitchen sparkle.
Understanding Kitchen Hinge Adjustments
The most essential first step is not to jump straight in. Take your time and be patient when identifying the correct type of hinge for your cabinets.
Many modern kitchen cabinets use concealed hinges, which are hidden inside the cabinets while the door is closed to give a sleek and contemporary finish. In contrast, other kitchens often use mounted or butt hinges, which are visible from the outside, offering a traditional aesthetic. Although the use and principles of both are similar, the screw positions will differ. This makes it essential to identify your hinge, ensuring that you are using the correct technique for proper realignment.
If you are still unsure, try identifying a brand name or number printed on the hinge and searching online for specific adjustment instructions for your style.
Most hinges typically have three adjustable screws, and each controls a separate movement of the cupboard door. Here's a simple breakdown of what each hinge screw does, and how it will transform your doors:
-
Side-to-Side Adjustment: This adjustment is the most commonly needed. It will assist in moving the door left or right to correct uneven gaps between the doors.
-
Height Adjustment: As the name suggests, this adjustment raises or lowers the door to align it with its neighbouring cupboard.
-
Depth Adjustment: This final adjustment will move your cupboard door closer to or further away from the cabinet frame, allowing it to sit flush.
Which Tools Will I Need?
You don't need to be a professional to complete this simple DIY. In fact, most households will have everything they need at hand.
Tools:
-
Screwdriver (or an electric drill with a screwdriver attachment)
-
A Spirit Level (not necessary, but allows for extra precision)
How to Adjust Kitchen Cabinet Doors
Now that you have the tools you need, and you understand how each hinge screw will adjust your cabinet doors in the way you need, you can put your skills to the test with these simple steps.
Step 1: Check Your Door’s Alignment
Step back from your cabinets and examine the gaps between them. Are they even? Do they sit lower than others? Identify exactly which cupboards need adjusting and get ready to begin.
Step 2: Adjust the Side-to-Side Adjustment
Open your chosen door and locate the side adjustment screw (1). Turn the screw clockwise to move the door closer to the cabinet hinge side or counterclockwise to move it further away. This will help align doors that rub together or have uneven spacing.
Step 3: Adjust the Height
If your door sits higher or lower than its neighbour, loosen the mounting screws (2&4) that attach the hinge plate to the cabinet’s frame and gently move the door up or down. Once the door is in its preferred alignment, you can retighten the screws.
Step 4: Adjust the Depth
If your doors aren’t closing properly or sitting flush next to each other, adjust the depth screw (3). Turn it clockwise to bring the door closer to the cabinet or counterclockwise to move it away from the cabinet. This will ensure a smooth closing and prevent the doors from bumping into their adjacent units.
Step 5: Test and Enjoy
Close your doors before stepping back and admiring your work. If there are slight fine-tunes that need making, make small tweaks until you’re satisfied. It is important to remember that doors should open and close smoothly, whilst still having even spacing.
Still unsure how to adjust your cabinets? Here are some examples which may help you figure it out.
-
My cupboard doors won’t close properly: Adjust the depth screw (3) to bring the door closer to the frame.
-
My cupboard doors are rubbing together: Tweak the side-to-side screw (1) to create an even gap between them.
Maintenance Tips
Once you have successfully aligned your kitchen cabinet doors, keeping on top of their maintenance will ensure a durable finish. Proper hinge alignment will not only enhance your kitchen’s appearance but also extend the durability of your kitchen cabinet. Here are some ways in which you can keep on top of your perfect kitchen:
-
Check your hinges every few months to ensure they are still sitting how you need them to. If you have a brand new kitchen, this is essential, as materials may settle over time.
-
Clean your hinges occasionally to prevent grease and dust buildup.
-
Try to avoid slamming your cupboard doors, as this will gradually loosen them over time.
Adjusting your kitchen cabinet doors may seem like a professional job, but it is actually one of the easiest Kitchen DIY jobs you can do. With proper care and attention to your kitchen, you can create a space worthy of your style that will be loved and cared for for many years to come.
For an easy update to your newly aligned cabinets, consider going the extra mile and upgrading your kitchen door handles to fall in love with your kitchen all over again.
Need help choosing your ideal fitted kitchen to test your new skills? Contact us; we are always happy to help.
Feeling inspired?
Book your free, no obligation, design consultation with one of our experts.

5 Inspiring UK Kitchen Renovators to Follow in 2025
Thinking of updating your kitchen this year? Whether you're planning a full remodel or just want some fresh ideas, these five UK-based kitchen influencers are transforming homes one cabinet at a time. Follow their journeys for DIY inspiration, clever layouts, and plenty of design-savvy advice.
Why Off-White Kitchens Are the Timeless Choice for Modern British Homes
Even in the most perfectly fitted kitchen, nothing ruins the beautiful look quicker than uneven cupboard doors. Over time, kitchen cupboard doors shif...

How to Buy a DIY Kitchen from Lark & Larks (Without the Showroom Price Tag)
Even in the most perfectly fitted kitchen, nothing ruins the beautiful look quicker than uneven cupboard doors. Over time, kitchen cupboard doors shif...
Next Steps

Get Inspired

Quick Advice Session

Book a Free Design Consultation
Contact us
0330 135 9090 [email protected]Don't miss out on kitchen inspiration
Sign up for the latest trends, inspiration and DIY hacks delivered to your email inbox.
Products
Help
About us
Kitchens & Bedrooms by Colour